Wij gebruiken cookies om uw ervaring beter te maken. Om te voldoen aan de cookie wetgeving, vragen we uw toestemming om de cookies te plaatsen. Meer informatie.


BME280 I2C or SPI Temperature Humidity Pressure Sensor
Schrijf uw eigen review
Klantenreviews
-
Werkend gekregen op Pi3Ik heb de andere variant (die vergelijkbaar werkt), maar de link daarnaartoe lijkt niet goed te werken op de SOSsolutions site.
Zie https://www.youtube.com/watch?v=xrRqFbohYJ8 samen met de comment door DoctorOnkelap
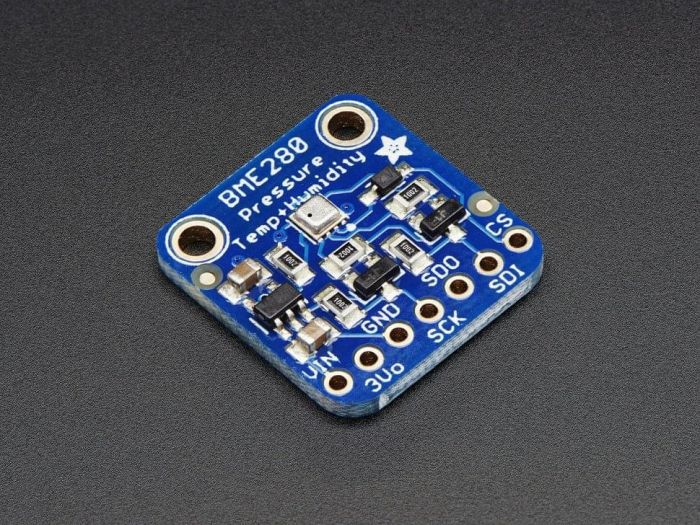
I have successfully adapted your tutorial for the Adafruit BME280 (https://learn.adafruit.com/adafruit-bme280-humidity-barometric-pressure-temperature-sensor-breakout) on a Raspberry Pi 3:
Pinconnections (BME280 - Raspberry Pi 3):
VIN is connected to pin1(3.3V PWR)
GND is connected to pin6(GND)
SCK is connected to pin5(GPIO3 (SCL1,I2C))
SD1 is connected to pin3(GPIO2 (SDA1,I2C))
Note that the 3Vo, SD0 and CS pins are NOT connected)
Also note that the order of the SCK and SD1 pins on the sensor is different from the order of the pin3 and pin5 pins on the Pi from left to right)
I used the same pinouts as "https://github.com/hendrychjan/valt-rpi" even though the sensor module is different.
The text of the BME280test.py file is:
import smbus2
import bme280
port = 1
address = 0x77
bus = smbus2.SMBus(port)
calibration_params = bme280.load_calibration_params(bus,address)
data = bme280.sample(bus, address, calibration_params)
print(data.id)
print(data.timestamp)
print('Temperature:',data.temperature)
print('Pressure:',data.pressure)
print('Humidity:',data.humidity)
print(data)
Note that the address of the Adafruit BME280 is (usually) 77 and NOT 76 like in the video (timestamp 1:49)
Also note that the line "calibration_params = bme280.load_calibration_params(bus,address)" is shown incompletely as "calibration_params = bme280.load_calibration_params(bus,$)" in the video (timestamp 2:41)
I found the original code on "https://stackoverflow.com/questions/53686612/rpi3b-bme280-attributeerror-module-object-has-no-attribute-load-calibration"
Korte samenvatting van de Instructie in de video: zorg dat je Raspbian op een SD-kaart zet en boot je raspberry pi hiervan.
Open via het Raspberry 'start'menu Raspberry Pi configuration en kies bij Conenctions Enable bij I2C, bevestig en reboot
Sluit de pins aan volgens de instructie vooraf (je moet dus pins op je module solderen voor dit werkt)
Maak een bestand met de texteditor Geany en noem deze BME280test.py en plak daar de bovenstaande code in.
Open een terminal in hetzelfde mapje als waar je je codebestand hebt opgeslagen. (Tools menu, dan open current folder in Terminal)
Typ pip3 install RPi.bme280 en druk op enter
(als python3 niet is geinstalleerd moet je eerst dat doen (sudo apt install Python-pip3 in de terminal uitvoeren)
typ i2cdetect -y 1 om het addres van de sensormudule te vinden (meestal 77 en dat zie je aan de laatste regel van die tabel met grotendeels streepjes --)
Mocht er bij jou een ander getal dan 77 staan, dan moet je dat in de code (regel met 0x77) aanpassen.
Je runt je code uit de terminal door python3 bme280test.py te typen en op enter te drukken
Gepost op